图像处理笔记 -- Python skimage 图像处理
基于 python 脚本语言开发的数字图片处理包,比如 PIL, Pillow, opencv, scikit-image 等。 PIL 和 Pillow 只提供最基础的数字图像处理,功能有限;opencv 实际上是一个 c++ 库,只是提供了 python 接口,更新速度非常慢。scikit-image 是基于 scipy 的一款图像处理包,它将图片作为 numpy 数组进行处理,正好与 matlab 一样,因此,我们最终选择 scikit-image 进行数字图像处理。
数据格式
from skimage import io, data
img = data.chelsea()
io.imshow(img)
print(type(img))  # 显示类型
print(img.shape)  # 显示尺寸,这匹配矩阵 / 线性代数符号,但与笛卡尔(x,y)坐标相反。
print(img.shape[0])  # 图片高度
print(img.shape[1])  # 图片宽度
print(img.shape[2])  # 图片通道数
print(img.size)   # 显示总像素个数
print(img.max())  # 最大像素值
print(img.min())  # 最小像素值
print(img.mean()) # 像素平均值
print(img[0][0])  # 图像的像素值(高度,宽度,通道数)
>>>
dtype
| Data type | Range | Function / Description |
|---|---|---|
| uint8 | $0$ to $255$ | img_as_ubyte Convert to 8-bit uint. |
| uint16 | $0$ to $65535$ | img_as_uint Convert to 16-bit uint. |
| uint32 | $0$ to $2^{32}$ | |
| float | $-1$ to $1$ or $0$ to $1$ | img_as_float Convert to 64-bit floating point. |
| int8 | $-128$ to $127$ | |
| int16 | $-32768$ to $32767$ | img_as_int Convert to 16-bit int. |
| int32 | $-2^{31}$ to $2^{31}-1$ |
| Function | Description |
|---|---|
img_as_float |
转换为 64 位浮点。Convert an image to floating point format, with values in [0, 1]. Is similar to img_as_float64 , but will not convert lower-precision floating point arrays to float64. |
img_as_float32 |
Convert an image to single-precision (32-bit) floating point format, with values in [0, 1]. |
img_as_float64 |
Convert an image to double-precision (64-bit) floating point format, with values in [0, 1]. |
img_as_uint |
转换为 16 位 uint。Convert an image to unsigned integer format, with values in [0, 65535]. |
img_as_int |
转换为 16 位整数。Convert an image to signed integer format, with values in [-32768, 32767]. |
img_as_ubyte |
转换为 8 位 uint。Convert an image to unsigned byte format, with values in [0, 255]. |
img_as_bool |
Convert an image to boolean format, with values either True or False. |
dtype_limits |
Return intensity limits, i.e. (min, max) tuple, of the image’s dtype. |
子模块
| 子模块名称 | 主要实现功能 |
|---|---|
| io | 读取、保存和显示图片或视频 Reading, saving, and displaying images and video. |
| data | 提供一些测试图片和样本数据 Test images and example data. |
| color | 颜色空间变换 Color space conversion. |
| filters | 图像增强、边缘检测、排序滤波器、自动阈值等 Sharpening, edge finding, rank filters, thresholding, etc. |
| draw | 操作于 numpy 数组上的基本图形绘制,包括线条、矩形、圆和文本等 Drawing primitives (lines, text, etc.) that operate on NumPy arrays. |
| transform | 几何变换或其它变换,如旋转、拉伸和拉东变换等 Geometric and other transforms, e.g., rotation or the Radon transform. |
| morphology | 形态学操作,如开闭运算、骨架提取等 Morphological operations, e.g., opening or skeletonization. |
| exposure | 图片强度调整,如亮度调整、直方图均衡等 Image intensity adjustment, e.g., histogram equalization, etc. |
| feature | 特征检测与提取等 Feature detection and extraction, e.g., texture analysis corners, etc. |
| measure | 图像属性的测量,如相似性或等高线等 Measurement of image properties, e.g., similarity and contours. |
| segmentation | 图像分割 Partitioning an image into multiple regions. |
| restoration | 图像恢复 Restoration algorithms, e.g., deconvolution algorithms, denoising, etc. |
| util | 通用函数 Generic utilities. |
| graph | Graph-theoretic operations, e.g., shortest paths. |
| viewer | A simple graphical user interface for visualizing results and exploring parameters. |
颜色空间转换
skimage.color.rgb2grey(rgb)
skimage.color.rgb2hsv(rgb)
skimage.color.rgb2lab(rgb)
skimage.color.gray2rgb(image)
skimage.color.hsv2rgb(hsv)
skimage.color.lab2rgb(lab)
颜色图谱
# cmap: 颜色图谱(colormap),默认绘制为 RGB(A) 颜色空间。
matplotlib.pyplot.imshow(X, cmap=None)
| 颜色图谱 | 描述 |
|---|---|
| autumn | 红-橙-黄 |
| bone | 黑-白,x 线 |
| cool | 青-洋红 |
| copper | 黑-铜 |
| flag | 红-白-蓝-黑 |
| gray | 黑-白 |
| hot | 黑-红-黄-白 |
| hsv | hsv 颜色空间,红-黄-绿-青-蓝-洋红-红 |
| inferno | 黑-红-黄 |
| jet | 蓝-青-黄-红 |
| magma | 黑-红-白 |
| pink | 黑-粉-白 |
| plasma | 绿-红-黄 |
| prism | 红-黄-绿-蓝-紫-…-绿模式 |
| spring | 洋红-黄 |
| summer | 绿-黄 |
| viridis | 蓝-绿-黄 |
| winter | 蓝-绿 |
对比度与亮度调整
图像亮度与对比度的调整,是放在 skimage 包的 exposure 模块里面。from
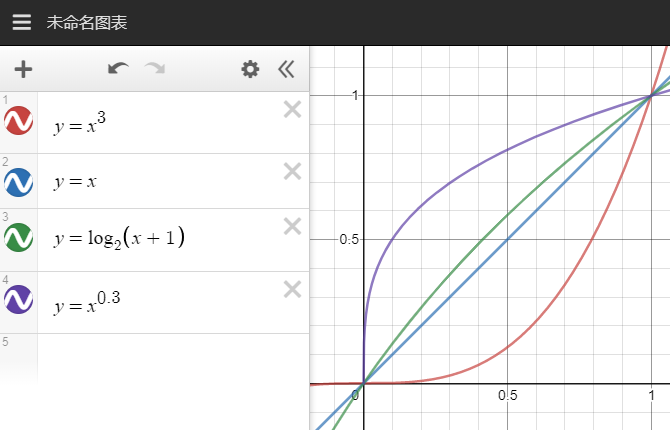
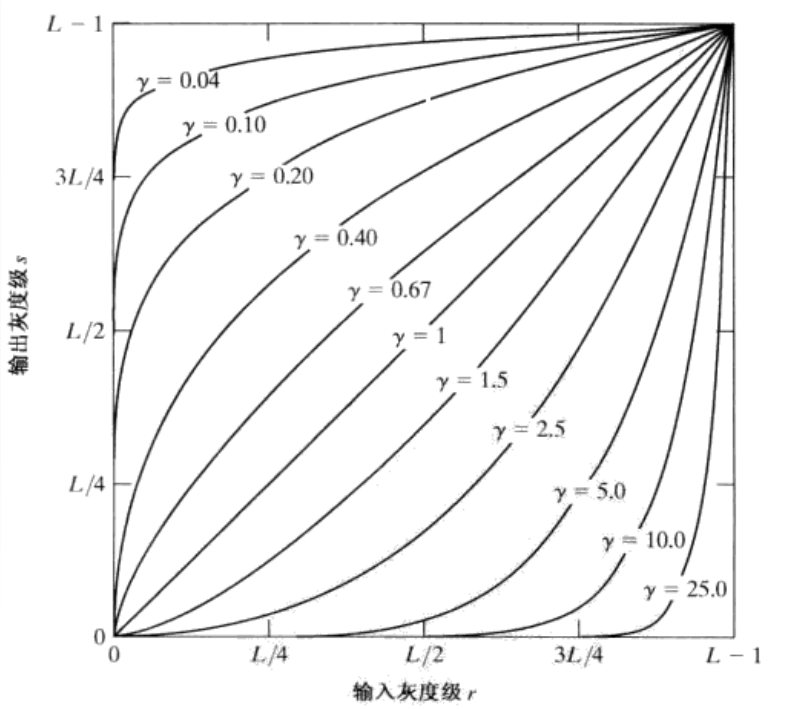
伽马变换对于图像对比度偏低,并且整体亮度值偏高(对于于相机过曝)情况下的图像增强效果明显。 当 $\gamma>1$ 的时候,高亮度的地方减少的更剧烈,所以对过曝效果较好。
对数变换对于整体对比度偏低并且灰度值偏低的图像增强效果较好。 貌似低亮度的地方,提升的更剧烈,所以可能效果更好一些?QUESTION???

gamma 调整
exposure.adjust_gamma(image, gamma=1, gain=1)
原理:\(O = I^\gamma\)
对原图像的像素,进行幂运算,得到新的像素值。
- 如果 \(\gamma>1\),直方图会向左移动,新图像比原图像暗;
- 如果 \(\gamma<1\),直方图将向右移动,新图像比原图像亮。

log 对数调整
exposure.adjust_log(image, gain=1)
原理:\(O = gain*log(1 + I)\)
这个刚好和 gamma 相反。对数变换主要用于将图像的低灰度部分进行扩展,高灰度部分进行压缩,最终达到增强图像低灰度部分的细节内容。
基本形态学滤波
膨胀(dilation)
一般用来扩充边缘或填充小的孔洞。
腐蚀(erosion)
可用来提取骨干信息,去掉毛刺,去掉孤立的像素。
开运算(opening)
先腐蚀再膨胀,可以消除小物体或小斑块。
闭运算(closing)
先膨胀再腐蚀,可用来填充孔洞。
白帽(white-tophat)
将原图像减去它的开运算值,返回比结构化元素小的白点。
顶帽变换的一个重要用途是校正不均匀光照的影响,通过顶帽变换,背景应会变得均匀。
黑帽(black-tophat)
将原图像减去它的闭运算值,返回比结构化元素小的黑点,且将这些黑点反色。
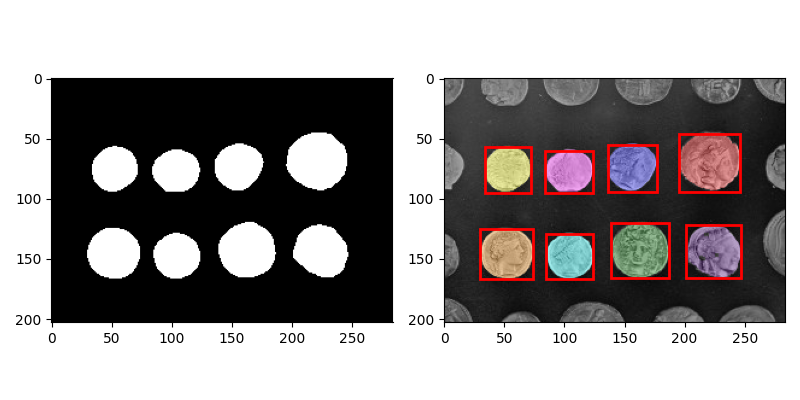
自动识别标注硬币
#encoding=utf8
import numpy as np
import matplotlib.pyplot as plt
import matplotlib.patches as mpatches
from skimage import data, filters, segmentation, measure, morphology, color

def imgshow(img):
    plt.imshow(img)
    plt.show()

# 综合示例:阈值分割 + 闭运算 + 连通区域标记 + 删除小区块 + 分色显示
# 加载并裁剪硬币图片
image = data.coins()[50:-50, 50:-50]

thresh = filters.threshold_otsu(image) # 阈值分割
bw = morphology.closing(image > thresh, morphology.square(3)) # 闭运算

cleared = bw.copy() # 复制
cleared = segmentation.clear_border(cleared) # 清除与边界相连的目标物
cleared = morphology.opening(cleared, morphology.disk(2)) # 去除孤立的小斑点
cleared = morphology.closing(cleared, morphology.disk(2)) # 大斑点内部联通

label_image = measure.label(cleared) # 连通区域标记

#imgshow(bw) # 完整的蒙版
#imgshow(cleared) # 干净的蒙版
borders = np.logical_xor(bw, cleared) # 异或
#imgshow(borders) # 去掉的蒙版部分

label_image[borders] = 0
# 不同标记用不同颜色显示
image_label_overlay = color.label2rgb(label_image, image=image, bg_label=0)

fig,(ax0,ax1) = plt.subplots(1, 2, figsize=(8, 4))
ax0.imshow(cleared, plt.cm.gray)
ax1.imshow(image_label_overlay)

for region in measure.regionprops(label_image): # 循环得到每一个连通区域属性集

    # 忽略小区域
    if region.area < 100:
        continue

    # 绘制外包矩形
    minr, minc, maxr, maxc = region.bbox
    rect = mpatches.Rectangle((minc, minr), maxc - minc, maxr - minr,
                              fill=False, edgecolor='red', linewidth=2)
    ax1.add_patch(rect)
fig.tight_layout() # 会自动调整子图参数,使之填充整个图像区域。
fig.canvas.set_window_title("自动识别标注硬币")
plt.show()
效果:

参考
- [1] python skimage 图像处理(一)

- [2] python skimage 图像处理(二)

- [3] python skimage 图像处理(三)

- [4] skimage — skimage v0.17.2 docs
- [5] scikit-image 教程
- [6] python 库 skimage 对图像进行 gamma 校正和 log 校正
- [7] 数字图像处理实现 · 资料丰富
- [8] opencv 图像变换原理详解 图像平移 图像旋转 图像缩放
参考资料快照
- https://scikit-image.org/docs/0.9.x/api/skimage.exposure.html
- https://www.jianshu.com/p/f2e88197e81d
- https://www.jianshu.com/p/66e6261f0279
- https://www.jianshu.com/p/7693222523c0
- https://scikit-image.org/docs/stable/api/skimage.html
- https://cloud.tencent.com/developer/doc/1221
- https://www.cnblogs.com/wojianxin/p/12649803.html
- https://www.cnblogs.com/wojianxin/tag/%E6%95%B0%E5%AD%97%E5%9B%BE%E5%83%8F%E5%A4%84%E7%90%86/default.html
- https://www.cnblogs.com/wojianxin/p/12591410.html
 .
.